Install VMWare ESXI 6.0 burn Downloaded ISO to USB
VMWare ESXI can be installed numerous ways but for the home user the quickest and most likely way will be from a USB Flash drive also known as a “thumb drive”. As of 2015 USB3.0 16gb drives are $20 or less, even some 128GB drives are $40 now!
Keep in mind we are installing ESXI from a downloaded ISO that we burn onto a USB flash drive. If you want to install ESXI onto a USB stick then you will need 2 USB sticks. 1 for install files, 1 for installation location of VMWare ESXI.
Here are some top pics for a USB Thumb drive:
SanDisk Ultra Fit™ CZ43 32GB USB 3.0 - $10.89 (Dec 2015)
The Ultra FIT CZ43 is a great low-cost medium performing USB stick, great for all around usage.
SanDisk CZ48 16GB USB 3.0 – $9.00 (Dec 2015) The Sandisk Ultra CZ48 is a step up in performance. Kingston Digital DataTraveler SE9 16GB USB 2.0 – $5.82 (Dec 2015) The $6 dataTraveler is another unit we have dozens of on-hand for various reloads, bios updates, installation files, and general file moving. These are super low cost, and so far have proven reliable. After selecting your 1 or 2 USB drives it’s time to get on to installing VMWare ESXI ISO onto the USB drive.
Requirements: These instructions are for burning VMWare ESXI to USB on the Windows opearting system. You must be running windows, and rufus and have one or two USB sticks to continue installation.
- Download the VMWARE ESXI .ISO File. You can download the “Free” ESXI version or you can download your licensed version from within your VMWARE user control panel.
- RUFUS is the software we use to burn ESXI ISO file to USB stick (Download Here)
- After RUFUS download completes you must “run” the downloaded .EXE file
- (Within Rufus Software) Toward the bottom of the software is a drop down menu you want to change this from the default (FreeDOS) to “ISO IMAGE”.
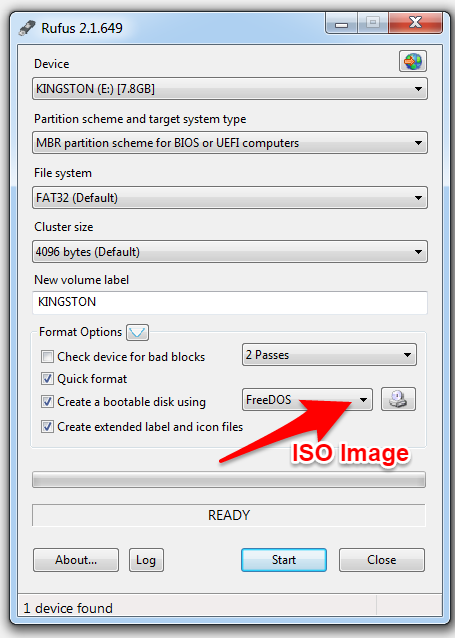
- (Within Rufus Software) Click the icon to the right of the drop down menu in step #4 and select the VMWARE ESXI iso file you downloaded in step #1.

- (Within Rufus Software) Click the START Button (bottom middle)
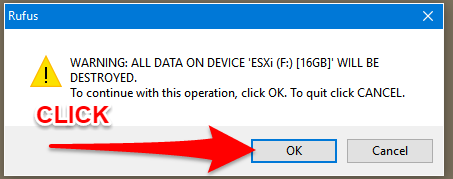
- Rufus will now start to burn the VMWARE ESXI ISO to the USB drive. In our situation that was a 16GB Sandisk drive. After you click “START” you may see a series of warnings, be sure to read them and then when sure click “OK” to continue.
Before install will start you’ll have to “OK” destroying/erasing all existing data on the drive.
You may see other errors related to data, partitions and the drive, read them thoroughly.
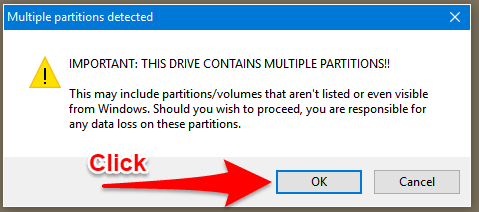
You may see an error about formatting your USB drive if you’ve already used it or have formatted it previously but didn’t use it. Be sure to double check you know that there is nothing you need on the USB thumb drive because once we format, and install the ESXI installer you won’t be able to retrieve your old, deleted, and formatted data.Once you’ve agreed and continued the ESXI ISO burn to USB will start, and look like this image.
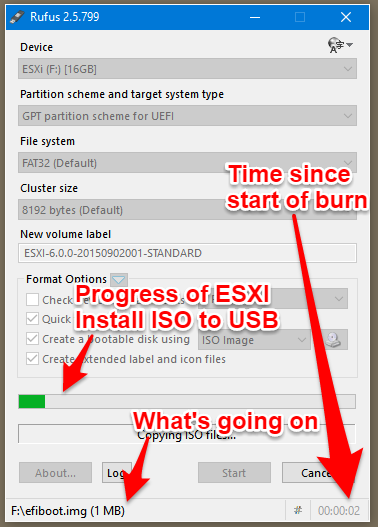
You’ll notice the settings are greyed out, a new progress bar a timer, and a filename of what’s being done/written.VMWARE ESXI 6.0 burn to USB stick will take less than 1 minute on USB2.0/3.0 devices! This is a really fast process, and makes boot-up and installation of ESXI very easy.
- Once RUFUS burn is complete you will remove the USB drive from your Windows system, and insert it into the server USB slot you wish to install vmware esxi onto. Remember, this is the installation USB drive if you plan to install to another USB stick then you will need a 2nd device. You do not have to install ESXI onto a USB stick, in fact in more serious installations you will install to a SATA or SAS SSD and then mirror them in case of failure.
ESXI Installation from USB drive — Coming Soon!